
Please wait, I'm coming over...

Last Changed 5/8/2011 |
||
Why AC electricity is important to us.A normal RV refrigerator uses AC or propane gas. When AC is not available, the propane gas is used. We have a household refrigerator and we need AC power all the time.When we are in a place where an AC plug-in is not available, we have a generator. However, running the generator may not be desirable or allowed. We also have an inverter which used DC voltage from the batteries to deliver AC power. We decided to add solar panels to our trailer to insure the trailer batteries get recharged. Also, even when we have AC shore power, the solar panels take over the job of the Inverter/Charger, reducing the amount of AC power we need from the park. It is our part of being a little green for the planet. |
||
Solar system descriptionWe could repeat the description of a solar system but there are very good descriptions available at Jack Mayer's website and at AM Solar Education, too good for us to repeat. |
||
The solar system we choseWe chose an AM Solar SunRunner system. AM Solar is owned by Greg Holder. We had taken classes on batteries, and solar controllers from Greg Holder at Life On Wheels. The thing that impressed us most is that Greg does his own testing with his own RV. He practices what he preaches.Not only does Greg test his own solar systems, his RV has three solar systems, two being competitors systems. When Greg says a SunRunner puts more juice into your batteries, he has observed it. We took Life On Wheels classes with Greg over a period of four years. In the LOW classes, Greg does not peddle his systems, he talks about several systems. When you ask him questions about competitor equipment, you will quite often get a response that the equipment is good stuff. At the last class we had with Greg, we asked about a Sky Blue solar controller. This solar controller had been recommended to us. Greg said it was a very good unit and then offered the fact that the Heliotrope solar controller used in the SunRunner system uses licensed technology from Sky Blue. That brought up the obvious question, “Is the SunRunner controller better?” His response said yes because the SunRunner systems are tweaked to perform best for RVers. Other systems, like Sky Blue, are very good but geared more for home installations. While AM Solar is an incredibly knowledgeable company, it is a small friendly company. The ordering process is very easy. I had the advantage of being located at a campground where Jack Mayer was workamping and he helped me do the installation. It is not that hard but it you feel technically challenged, AM Solar has an excellent installation team. |
||
Wiring for the Solar SystemThe SunRunner Kit comes with a very complete set of cables and wires to connect the system. We choose to beef up the #8 down-feed cables included in the kit.When we ordered the Travel Supreme trailer, we added a Solar Prep kit and we requested #8 wires be used instead of the normal #10. Bigger wire reduces voltage losses. Somewhere in the order process, the #8 requirement got lost. When we went to install the solar kit, we tried to use the #10 wire in the Solar Prep kit to pull bigger wire. Unfortunately, the way the wires were run through the walls and ceiling of the trailer, pulling the existing wires was out of the question. After we had ordered the trailer, we came to the decision that we should have asked for #6 wires. So the order error was not all that bad. We would have had to run new wire anyways. |
||
Solar ControllerWe choose the SunRunner kit with the Heliotrope HPV-30DR solar controller. This is a 30 amp solar control that is very sophisticated in solar charge management. This controller will handle six solar panels so we can grow 50% from the four solar panels we installed.The HPV-30DR has a remote control monitor panel that we mounted above the Inverter remote control panel. |
||
Solar PanelsThe AM100 solar panels used in the SunRunner Kit have 44 cells instead of the typical 36 cells. These are custom panels made for AM Solar. The extra cells contribute to the extra battery power the SunRunner system delivers from a sunny or semi-sunny day,The AM100 solar panels are a couple of inches narrower than typical panels making easy to install the panels along side of the air conditions on the roof. The rocker foot mounts for the solar panels were glued to the roof using VHB (Very High Bond) 3M tape so we did not have to drill the roof. The base kit comes with one solar panel. We added three more panels for to make a 400 watt system. This is about the right size for the 440 amp-hour capacity of our house batteries. |
||
Combiner BoxThe CB Combiner Box in the kit has the terminal strips that the solar panel wires are combined to the main feed down to the solar controller. |
||
Panel Tilt BarsWe added tilt bars to the solar panels. These bars allow us to elevate the panel towards the sun when it is low in the sky. |
||
Battery MonitorWe also installed a TriMetric 2020 Battery Monitor to provide more information on the real condition of the charge of our batteries. Since we have two sources that can charge the batteries, the solar panels and the Inverter/Charger, we needed something that was independent to the two sources. We acquired the TriMetric 2020 from www.solarseller.com.For example, the Inverter/Charger can be showing a float charge of 4 amps and the TriMetric will show 0 amps. This is because the 4 amps is being used by devices (lights) in the trailer. Thus the Inverter/Charges is showing a float charge but none of it is going into the batteries. |
||
The Installation |
||
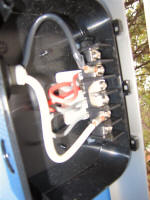 |
This is a close-up of the wiring connections to the AM100 solar panels. | |
 |
The electrical connection box for the AM100 solar panel is located under the panel. The panel is raised for access. |
|
click on images to enlarge |
||
 |
The AM100 solar panel electrical connection box with the cover on. | |
click on images to enlarge |
||
The hardest part of the installation was the hole in the roof. To route the solar down-feed wire, we had to find a different route. We drilled a hole through the roof over a 3” wall that was used for other wiring runs. This was a very worrisome step as we did not want a leaking roof. The hole in the roof was not easy. The ceiling of the Travel Supreme is rather thick. We cut a 1-1/4” hole through the fiberglass roof and then through the ½” plywood layer under the fiberglass. Then a couple inches down was a wood cap piece at the top end of the wall we had to drill through. We had a 12” long ¼” and 3/8” drill bit we used to make the initial holes. We needed a hole big enough for a dual #6 cable with an insulated cover around the dual conductors, and a Cat-5 cable. The 3/8” did not make thick enough holes and the challenge was to widen the oval hole in the cap piece through the hole we had in the roof. It took several hours of using the scraping action on the side of the drill bit to enlarge the hole. |
||
 |
This is the CB Combiner box. It is glued to the fiberglass rood with M 5200 adhesive caulk over the hole we drilled into the roof.
The heavy #6 wire goes through the roof down to the solar controller in the electrical compartment. The lighter wire is #10 to the solar panels. We ran and additional bead of regular RV roof caulk around the box/roof seam as a second layer of protection from leaking. |
|
click on images to enlarge |
||
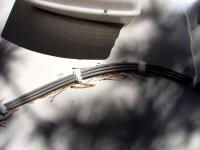 |
The cables from the Combiner Box to the solar panels were attached to the roof with wire tie pads and/or puddles of roofing caulk. - Look below for how we redid this wiring. |
|
 |
Here is a AM100 solar panel being elevated by the Tilt Bars. The Tilt Bars can be located on either set of panel feet so the solar panel can be directed in either direction when the sun is low in the sky. The feet for the solar panels are glued to the fiberglass roof with VHB (Very High Bond) tape. This means we did not have to make holes in the roof for attaching the panels. |
|
click on images to enlarge |
||
 |
Here are three of the four AM100 solar panels on the front end of the roof. | |
 |
Here the AMS100 solar panels in the flat position. | |
click on images to enlarge |
||
 |
A view not often seen of a RV trailer, the roof. A long shot of the trailer roof showing all four AM100 solar panels. There is room for at least four more panels if we need to expand. On the right is the WISP antenna. |
|
 |
The Heliotrope HPV-30DR is mounted in the electrical compartment. The converters would normally be mounted here but we do not have converters because that function is provided by the inverter/charger. | |
click on images to enlarge |
||
 |
A closer view to the Heliotrope HPV-30DR. | |
 |
The power display panels are mounted on a wall in the bedroom. This is the same wall that provided the cable access to the roof. | |
click on images to enlarge |
||
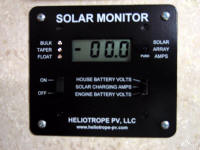 |
The remote control/display for the Heliotrope HPV-30DR. | |
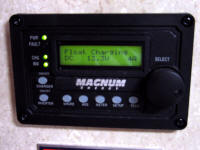 |
The remote control/display for the Magnum Inverter/Charger. | |
click on images to enlarge |
||
 |
The TriMetric 2020 Battery Monitor. The TriMetric measures all current into and out of the batteries. It provides a truer picture of the state of the battery bank than the charge values of the inverter/charger and the solar system. | |
Schematic of Solar System |
||
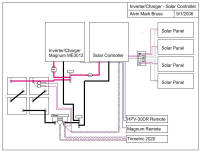 |
The schematic of the Inverter/Charger, Solar Controller, and the TriMetric controls. | |
click on images to enlarge |
||
Redoing the Solar Panel Wiring |
||
| One of the problem of attaching the cables from the solar panels
is that the cables create water dams on the roof which hinder rain
runoff and are serious dirt catchers. We decided to rewire the panels by running wires in PVC conduit. The PVC bodies that are used with the PVC conduit hold the conduit about a 1/4" up from the roof. For longer runs (>18"), wire tie plates were installed to keep the PVC conduit from sagging. Also from experience, even though the PVC is rated for exterior use, we pre-painted the PVC with white paint. | ||
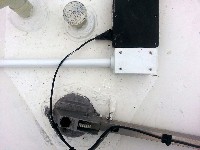 |
The black box is the original combiner bow. The combiner box had 1/2" connectors which would have required multiple conduit runs. To simplify the conduit runs, two 1/2" connector were installed in two of the combiner box holes and into two holds drilled into a PVC utility box. The wires were fed through the connectors into the utility box and out the 3/4" PVC conduit. | |
 |
The wires were run in conduit under the panels where a PVC conduit box had a watertight connector removed from the combiner box glued into one end. | |
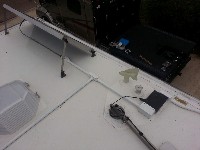 |
A Tee body was used to cross the roof. | |
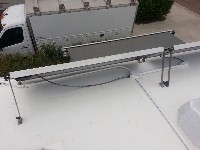 |
Under the center of three panels, a round PVC box was used. One of the four ports run to under the forward panel. One port had a weatherproof connector glued in for the center panel. The fourth port ran to the rear panel. | |
 |
The skylight was in the way of a straight run of conduit. We
used the capability of PVC to be reshaped when heated. We used a heat gun to make the two S-bends in the conduit. |
|
Disclaimer: The information in this site is a collection of data we derived from the vendors and from our personal experiences. This information is meant as a learning guide for you to make your own decisions Best practices and code should always be followed. The recommendations we make are from our personal experiences and we do not receive any compensation for those recommendations. |