 |
 |
 |
Last Changed 9/5/2018
|
 |
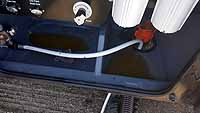
This is the sign that we had a problem. Black tank fluid in
the wet bay. |
 |
Diagnostics showed that the problem was not tank
related. We hooked up the Black tank flush and watched the water
flow out the sewer line through the clear adapter with no leakage
down the back wall of the wet bay.
When we flushed the toilet, we observed fluid running down the back
wall of the wet bay. So our problem was pump related.
The Bounder has a VacuFlush system. When you flush the toilet, a
vacuum on the toilet drain sucks the fluid in the toilet bowl into a
reservoir. The fluid is then sucked from the reservoir through the pump which
macerates the materials in the fluid as well as creating the vacuum
in the reservoir for the next flush. The pump, also known as
the vacuum generator, pushed the fluid into the Black tank.
When we opened the compartment where the vacuum pump is located
above the propane tank, we observed fluid spurting the top of the
pump when the toilet was flushed. Know we knew where the
problem was.
First thing is to talk photos to remember how stuff goes.
|
 |
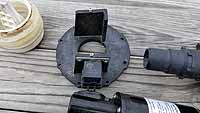
This is the body of the pump disassembled.
This is the top of the pump body. |
 |
click on pictures to enlarge |
Some notes on the removal of the
reservoir and pump from the RV. Each has
four screws that fit into slots on the base. Removing the front two
screws and loosening the rear two screws is enough to slide the pump
and reservoir out. There are quick disconnect cables.
Some how mark the position of items as they are removed. It is
very easy to rotate the position of items and be wrong. How to
mark the black plastic parts is a challenge. Maybe scribe
marks?
The pump disconnects from the reservoir by just pulling it
out. It is a friction O-ring fit into the reservoir. The same
with the hose from the toilet.
|
 |
To remove the motor, there are four screws through the square
plate the motor is attached to. You do not need to remove the
flathead screws from the plate to the motor. If you remove the
screws, the orientation of the plate to the motor is critical. I
figured that out the third time.
Properly positioned, the motor shaft is centered and close to the
pump body. |
There is a set screw on the cam on the motor shaft.
Mine was too tight to unscrew with an Allen wrench. I used a
pair of water pump pliers to hold the can while I used a wrench on the bolt
through the bellows arm.
The water pump pliers also enable the rotation of the cam so all
four screw that holds the motor plate can be removed.
|
click on pictures to enlarge |
 |
This is the bellows that sits in the pump body. The motor
strokes the bellows causing the pumping action.
You can see why we had fluid coming out of the pump top. The
bellows was cracked open in one of the creases.. |
The collar of the bellows has two clamps that push fit
around it. It will be necessary to clean the caked stuff off the collars
so that there is a tight fit around the bellow upper lip.
Now the challenge is to force the collars into the top of the pump
body and insuring that the arm of the bellows is aligned properly.
The arm need to be inline with the center line of the pump
input and output fittings. If the arm is not properly aligned,
the bolt through the bellows arm will not fit into the motor cam.
With the bellows with collars are in the pump body, then the pump top
is installed. There are two seals, one around collar that
inserts into the top of the bellows. The other is a square
ring around the pump body.
The pump top can be 180 degrees, the screw
holes are symmetrical. I
had that right the second time.
With the top installed, then the motor can be installed. You
have to rotate the motor cam to get all four screws in. The
top stalks of the pump top can appear to be out of alignment, you just need to push the
two stalks towards each other to get the last screw in.
With the motor installed, now put the bolt through the bellows arm
into the motor cam. Make sure the face of the arm is parallel
to the cam face.
|
 |
This is the reservoir that the toilet is sucked into and the vacuum
pulls the fluid out. |
 |
click on pictures to enlarge |
 |
This is the hose from the toilet. It just pushes into the
reservoir. |
 |
This is hard to see but the lower white hose if from the pump output
into a black plastic set of elbows that rise to the top of the Black
tank, the flat wall in the background.
The elbows fit into a gasket hole in the top of the Black tank. The
challenge is keeping the elbows into the tank and getting the hose
onto the pump. |
click on pictures to enlarge |
 |
Here is everything back together. |
|
The hardest part was waiting for the parts. Of course a repair like this happens on a long
holiday weekend. Lots of walks to the park bathroom.
|

